you are here > articles/mwexquilting.html

Old-Fashioned Logo Quilt-Making with MicroWorlds EX
© 2004 Gary S. Stager

Objective: Explore turtle graphics to create several geometric patches that may be combined with those created by your peers in the construction of a digital quilt.

The most well-known, and perhaps powerful, aspect of Logo is turtle graphics. The turtle has a pen in its middle and when it moves, with its pen down, it drags the pen – resulting in a drawing. The intuitive nature of drawing makes complex mathematical ideas concrete. Many books have been written on the topic and few classrooms ever move beyond the drawing of simple geometric figures. Turtle graphics is a powerful “microworld” for doing and learning mathematics.

MicroWorlds EX features an unlimited number of turtles. These turtles don’t just draw, they themselves can wear costumes, be animated and interact with their environment. MicroWorlds EX introduces a new data structure, the backpack. The backpack contains procedures (programs), information about the turtle multimedia objects and instructions for how to the turtle should interact with the environment. The turtle is in short, the main actor in MicroWorlds EX.

This project will keep things simple, unless you develop more sophistication, and focus on one turtle drawing. There is lots of help available in the PDF manual and the help and techniques built in the software. The following instructions are not intended to be comprehensive. Use the CoP and online materials to fill-in the blanks. Some screens look slightly different between platforms.

Getting Started and Messing About

  • Boot MicroWorlds EX
  • Click on Free Mode
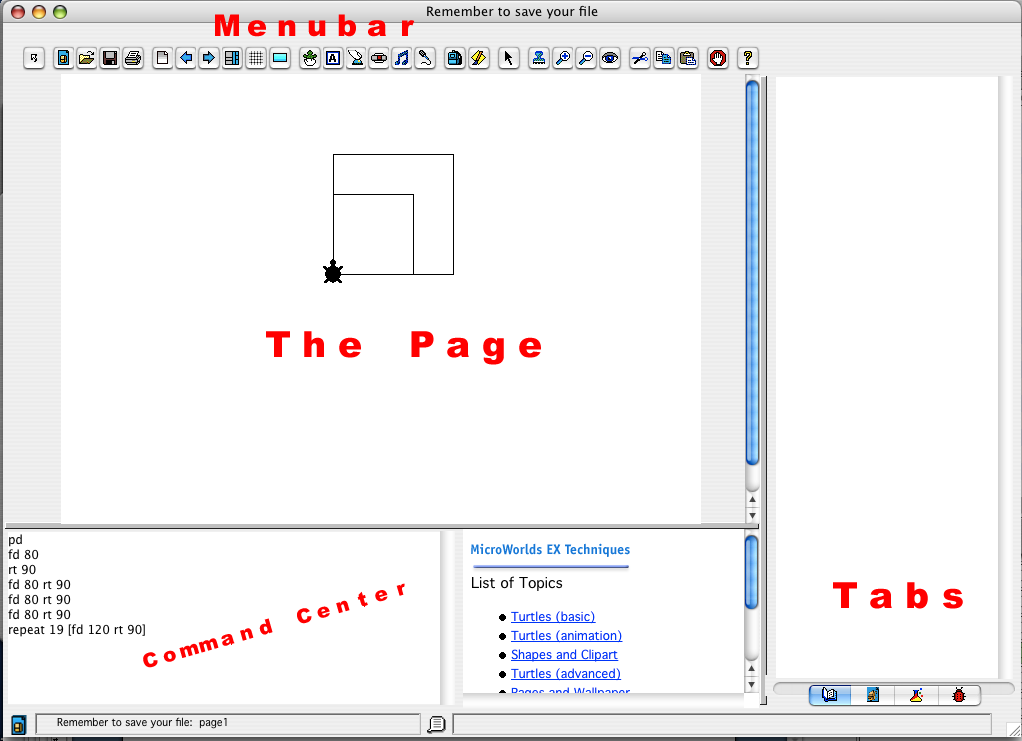
  • Hatch a new turtle by clicking on the hatching turtle tool on the menubar and then on the page.
  • You may move a turtle by clicking on it with the mouse and dragging it elsewhere on the page.
  • You may turn the turtle in rough increments by clicking on its nose and dragging left or right.
  • Experiment with the following commands in the command center. Be sure to separate a command and its input with a space. You may combine commands on one line if you separate them with spaces before hitting enter/return.
  Turtle graphics commands
Basic turtle graphics commands
fd, bk, rt, lt are abbreviations

forward number

fd number

back number

bk number

right number

rt number

left number

lt number

pd

pu

cg

clean

setc number

setc random 256

fill

repeat number [list of instructions]

  • What happens when you use large numbers?
  • What do the various commands do?
  • You may re-run a line in the command center or even edit it by scrolling onto the line and then hitting return/enter.
  • Leave your mouse over a command for a few seconds and the proper use of the command will pop-up.

The Turtle’s Backpack

Every turtle has a backpack. It contains all sorts of treasures. The turtle and the contents of its backpack may be exported and used in multiple projects or even emailed to a friend.

  • Open the backpack of a turtle by either right-clicking (PC) or CTRL-clicking (Mac) on the turtle.

The backpack should open. In it you should see six different tabs. The default tab is state. This tab provides information about the current state of the turtle. In this activity, we will only use the state & procedures tabs.

It’s probably a good idea to name your turtle uniquely. Otherwise, MicroWorlds EX will name turtles t1, t2, t3… etc.

  • Name your turtle by clicking on the Edit… button and inserting a new ONE WORD name, firstname/lastinitial, such as garys will do nicely for our purposes. Turtle and procedure names must be one contiguous string of characters - no spaces.
  • Next, click on the Procedures tab at the bottom of the backpack window.

Procedures are the programs we write in MicroWorlds. A procedure is a list of instructions with a name. Procedures may be comprised of other procedures and the procedures built into MicroWorlds are called, primitives.

Procedures may be stored in the turtle’s backpack and then are unique to that turtle or are kept in the project’s procedures tab. Project procedures may be used by any object in the project. The project is what we call the complete file in MicroWorlds – process and product.

It’s easy to create a procedure, but they don’t always work as expected. That’s where the intellectually-rich process of debugging comes into play.

Procedures always begin with the word to followed by the name of the procedure and end with the word end. to & end need to be on their own lines.

For example:

to foo
repeat 23 [fd 57 rt 106]
end

to fooey
foo fd 75 foo
end

Foo is a procedure and fooey is another procedure that uses foo as a subprocedure. Simple Logo procedures may be combined to create complexity. You might think of them as building blocks or as verbs that do something when invoked.

Note: You edit procedures by changing them. You cannot have more than one procedure with the same name and you may not name a procedure with a word used already as a MicroWorlds primitive.

Making a Quilt Patch

In order to create a communal quilt, we need to agree upon dimensions. Let’s use the following procedure, frame, as the base for all of our patches. It creates a black 100 X 100 square.

  • Type frame in the command center and observe the error message indicating that the word is not yet part of MicroWorlds’ vocabulary. That can be fixed!
  • Type the following procedure in the procedures tab of your turtle’s backpack.

to frame
pd
setc "black
repeat 4 [fd 100 rt 90]
end

  • Close the turtle’s backpack.
  • Type frame in the command center again and see what it does. You should get a black square drawn on the page.

Your Assignment Should You Choose to Accept It

Once the frame is drawn, your job is to create colorful creative designs within the frame.

Rules: The only rule is that your turtle must return to its original position and heading at the end of the design.

  • Use the turtle graphics commands you learned earlier to draw a beautiful design in the command center.
  • If you mess-up, type cg frame, and start again.

Once you are delighted with your creativity, it’s time to teach the instructions to the turtle so they may be remembered and repeated. You will do so by adding a new procedure to the turtle’s backback.

  • Open the procedures tab in the turtle’s backpack.
  • Below or above the frame procedure, hit return and type the following:

to patch
frame

end

  • Paste or retype your design instructions between frame and end.
  • Close the backpack.
  • Type cg patch in the command center and see if your quilt patch is drawn as expected.
  • If there is a bug, think of a solution and change the procedure in the backpack.

You may also program the turtle to draw the patch automatically when it is clicked on. To do so, follow these instructions:

  • Open the turtle’s backpack.
  • Click on the rules tab.
  • Type patch in the OnClick field. Make sure that once is selected.
  • Close the backpack.

Copying a Turtle

  • You may right-click/ctrl-click on a turtle to copy or cut it to the clipboard.
  • You may also drag the arrow cursor around a turtle to hilight it's handles and then copy or cut it from the menu or keyboard shortcuts.
  • Paste the turtle from the ctrl-click/right-click contextual menues, the Edit menu, or keyboard shortcuts.
  • The turtle you paste has all of the same contents (and therefore behaviors) of the turtle you cloned.

Make Additional Patches

  • Copy and paste a duplicate turtle and change the patch procedure to create a patch with a new design.
  • Follow the instructions above to program the new quilt patch. All you need to do is change the content of the patch procedure.
  • Type patch in the command center to draw a turtle’s patch, or click on it if you programmed the OnClick instruction.
  • If you have multiple turtles, you may speak to them by typing their name followed by an immediate comma. Then any instruction that follows will be directed to that turtle. For example:

garys, patch
t2, patch
murrays, patch
garys, patch

Export Your Turtle(s)

  • Right-click/CTRL-click a turtle and select export.
  • Save your turtle.
  • Repeat as necessary.
  • Post your turtle in the Blackboard forum.

Assembling a Quilt

  • Download several of your classmate’s turtles.
  • Open your MicroWorlds project.
  • Import each turtle via the File-Import-Import Turtle menu.

The Big Challenge!!!

As mentioned earlier, projects may have procedures, just like turtles. Writing a quilt procedure in the procedures tab of the project can ask all of the turtles to position themselves and draw their individual patch adjacent to others. Typing quilt in the command center would then draw the entire quilt.

Repetition and symmetry are routine patterns in quilts.

  • Can you figure out a way to create a quilt made of communal patches and triggered by one project procedure??

Solving Problems (getting Help)

I would recommend that you solve problems in the following order:

  1. read your error messages and use Last Message in the Help Menu for explanation
  2. hold the cursor over a MicroWorlds command for contextual help
  3. use the built-in techniques
  4. use the built-in tutorials
  5. read the pdf manuals
  6. use the built-in samples for deconstruction purposes
  7. check the built-in vocabulary (although you don't need to memorize a language before you communicate)
  8. ask for help


Home | Search |Articles | iMovie | Bookstore | Bio | Booking Gary
Locations of visitors to this page
Copyright © 2003-2007 Gary S. Stager - All Rights Reserved.